


Angela is an employee at a financial services company. Imagine that her organization needs to know that she read the quarterly earnings report—and it needs to verify this with near 100% certainty.
In many business settings, it’s important to verify whether a certain person has read a given doccoument. The client was no different. In May 2016, Lauren Gallinaro and I used blockchain to build a compliance solution: a tamper-proof read-receipt application that connects to our client’s mobile app via REST.
This is the situation our application addresses. The application we built uses Node.js, MongoDB, Ethereum, Docker and followed ES 6 standards wherever possible.

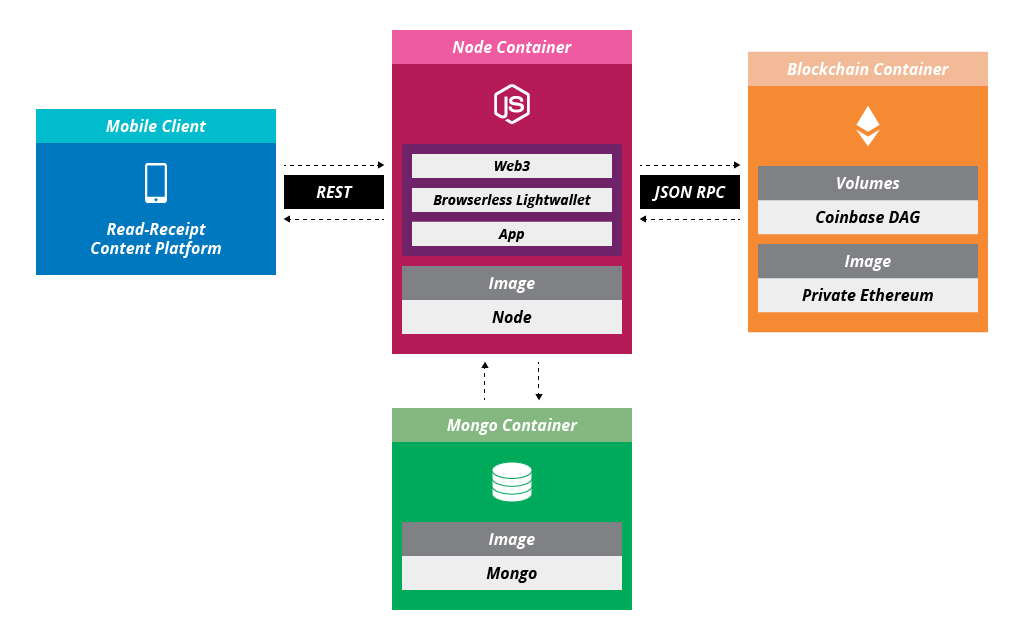
Building the App
Ethereum was chosen for several reasons. The community is vibrant and supportive, the documentation is helpful, and—at the time—the community had not yet prioritized social consensus over algorithmic consensus. An Ethereum mobile client did not exist when we started our project, so we knew we needed to build a layer between the mobile application and the blockchain. We chose to fork an existing Ethereum light client—which was meant to be used in a browser—so we modified it for use in a Node.js application.Light clients do not run full blockchain nodes and are therefore not responsible for the computationally intensive process of mining. There are some network risks with light clients; however, if they are used in an ecosystem that has a sufficient number of full nodes, then the risk is minimized. Using a light client allowed the Node app to be solely responsible for creating wallets and signing transactions with addresses from those wallets. Our Node app exposes a REST API which receives requests from the mobile client to create addresses.


Mobile client post request to create Angela’s address...

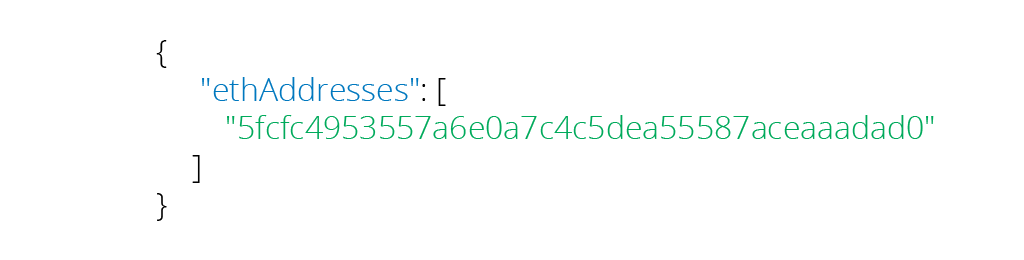
...which returns her public Ethereum address
Our Node app generates a private key which then creates a public Ethereum address, both of which are stored in a wallet. Once a wallet is created, the wallet is saved in the Mongo database to persist addresses across sessions.
For those with an eye for security risks, you’re probably thinking it’s not a great idea to save a private key in a database. A better implementation would have only one private key for every instance of the Node app. An ideal implementation would use a mobile light client so that the private keys would live only on the phone.
Since there was no mobile client for Ethereum at the start of this project and managing multiple Node instances would have proven cumbersome for such an early stage MVP, using Node and Mongo to sign transactions remotely made the most sense.
The Node app communicates with the blockchain via Web3, an Ethereum JSON-RPC client. In our application, the blockchain is used as a distributed database to store an interaction between a user and a document, indicating that they have seen or read it.
One limitation we encountered early on with Ethereum: using a currency-based blockchain requires money to be used in places where it doesn’t make intuitive sense.
To record that Angela has read the quarterly report, both she and the report need to have addresses on blockchain. Angela also needs to have currency to send. In order to do this, we need an initial address with some Ether, so we configured our blockchain to deploy with a pre-seeded coinbase address.

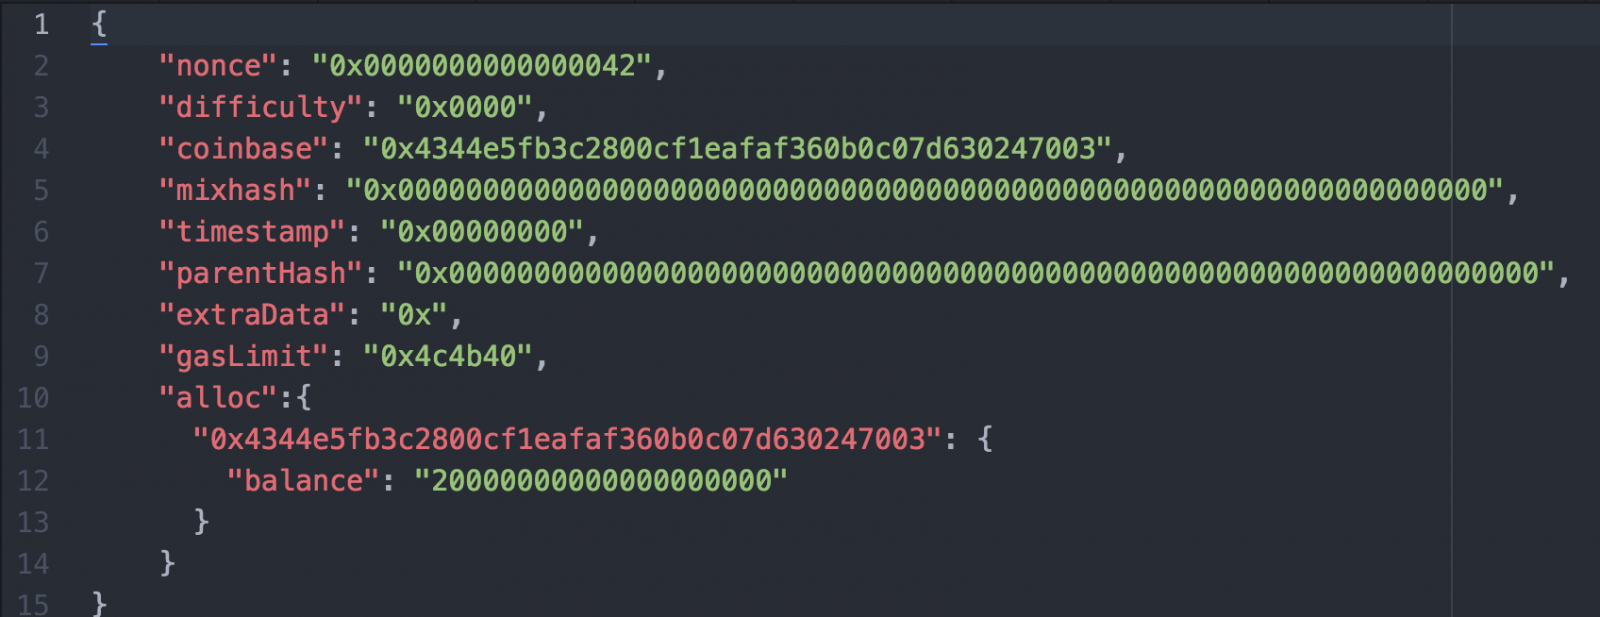
The coinbase address “0x4344” being allocated funds
The simplest way to do this was to create an address, allocate funds in the genesis block, and store the private key in the project directory. This allows the coinbase to automatically receive the pre-allocated funds once the blockchain is created.
Now that the coinbase has been created, the mobile client makes a request to our Node app to create addresses for Angela and the quarterly report. Once both addresses are created, we need to send Ether to Angela. There are many ways to do this, but for the sake of keeping things simple, we made this a manual process. Using Web3, an admin user would then initiate a transaction from the coinbase to Angela.


Now that Angela has Ether, when the mobile client makes a request to the Node app signaling that Angela has read the quarterly report, the Node app will trigger the corresponding actions on the blockchain to send Ether from Angela’s address to the report’s address. Once completed, it is easy to confirm a transaction has occurred.

The transaction awaiting mining
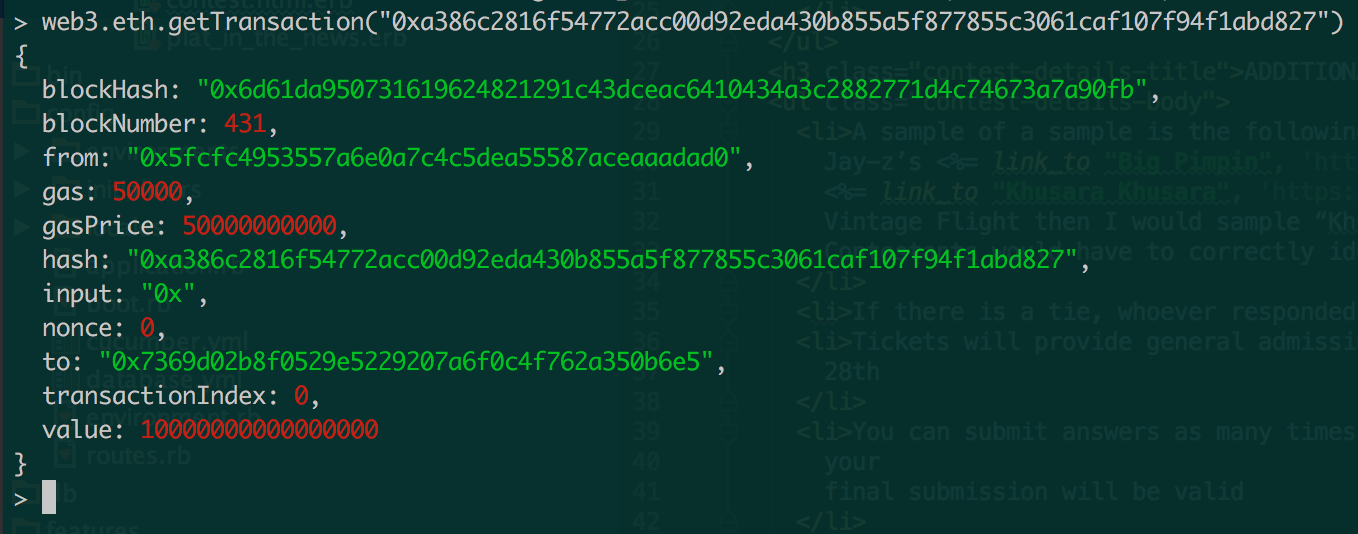
Getting the transaction
Currently the interface to view this information is a command line; however, we envision a chain explorer such as etherchain.org could work well for an admin or oversight user to coordinate accountability.
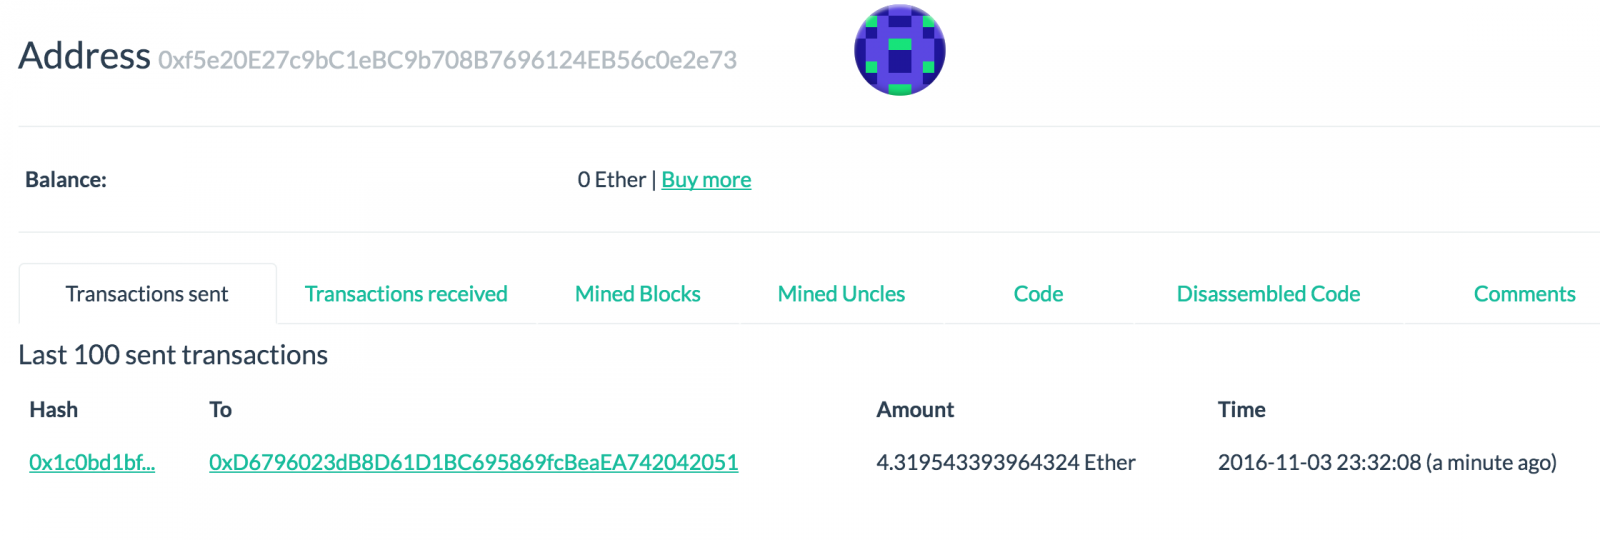
Screenshot of a public Ethereum transaction
Dockerization
Throughout the project, the integration point between the mobile client and our applications was never thoroughly defined. This led us to believe that our deployment method should be fairly flexible and this felt like a job Docker would be well suited for.Since we used Docker Compose to orchestrate the communication between containers, dockerizing our Node and Mongo applications was fairly simple. However, dockerizing our blockchain node was more involved.
The Ethereum Foundation’s Docker image had some limitations because it would not allow us to easily configure the created Ethereum node. The image was well suited for public blockchain implementations, but was not as flexible for private node implementations.
Simple command line actions now seemed more involved, while some did not even appear possible. There are times when it’s best to do things yourself, and eventually, this became one of those times. We created an Ethereum image which allowed us to more easily configure things such as working directories, networking permissions, and load a genesis block.

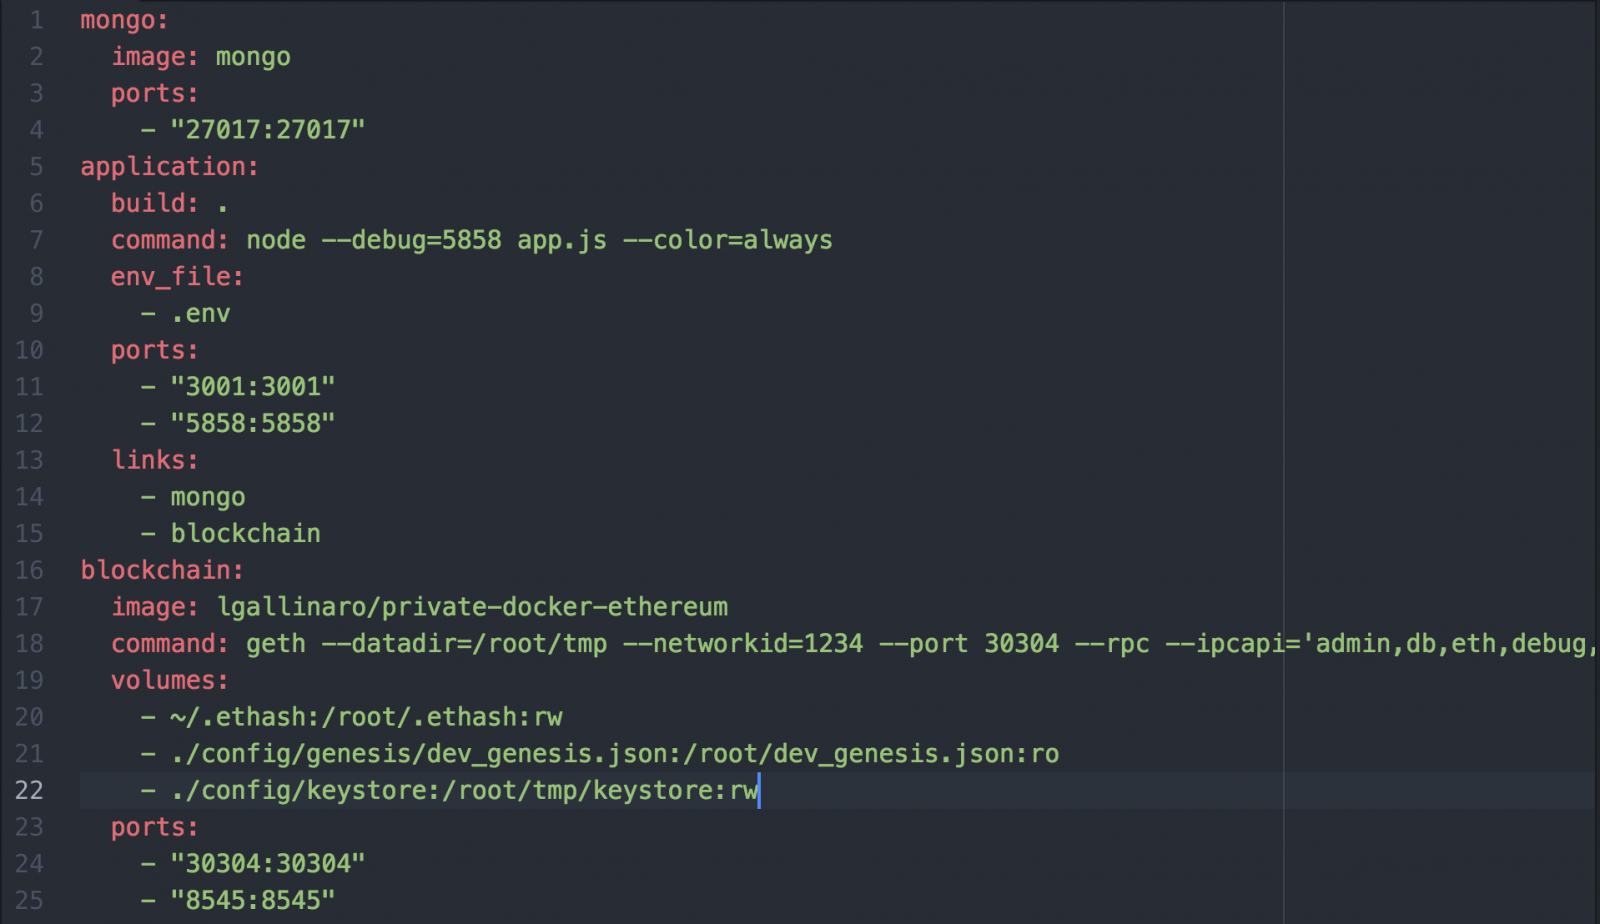
The Docker compose file we used to configure all our containers
Our image enabled us to successfully create a private blockchain container; however, we still had some networking issues between Node and the blockchain. By default, Docker is configured to prevent containers from talking to one another directly, so we had to configure the Node container to call the host OS address on the same port the blockchain had exposed. Docker will automatically forward requests from the host OS to the corresponding container so this strategy worked well for us.
Testing
One of the most vexing challenges we faced was finding a way to properly test our application. We currently have two layers of testing: unit and functional. Our WalletController uses two classes, Provider and Keystore. Provider is responsible for handling the JSON-RPC connection to blockchain and Keystore is responsible for creating the private and public keys.Both of these classes are covered in Mocha unit tests; however, to gain full confidence in our WalletController, we wrote tests that confirmed the Node app modified the blockchain in an expected manner. This required us to run a local node, seed coinbase and transfer funds to every spending address in our tests. We were able to automate this setup within the test suite which became extremely useful for performing quick sanity checks.
Testing in blockchain and Node can also be difficult because of the asynchronous nature of both environments. Once a transaction is executed on blockchain, it is not guaranteed to be included in the next mined block. We discovered that Mocha executed tests much faster than the blockchain could mine and inserting sleeps or increasing the allowed timeout felt like a band-aid solution. Delving into the Web3 documentation helped us realize that a better solution would be to wait for a set number of blocks to be mined before executing assert statements. We settled on waiting four blocks and this was a much more efficient way to run our tests.

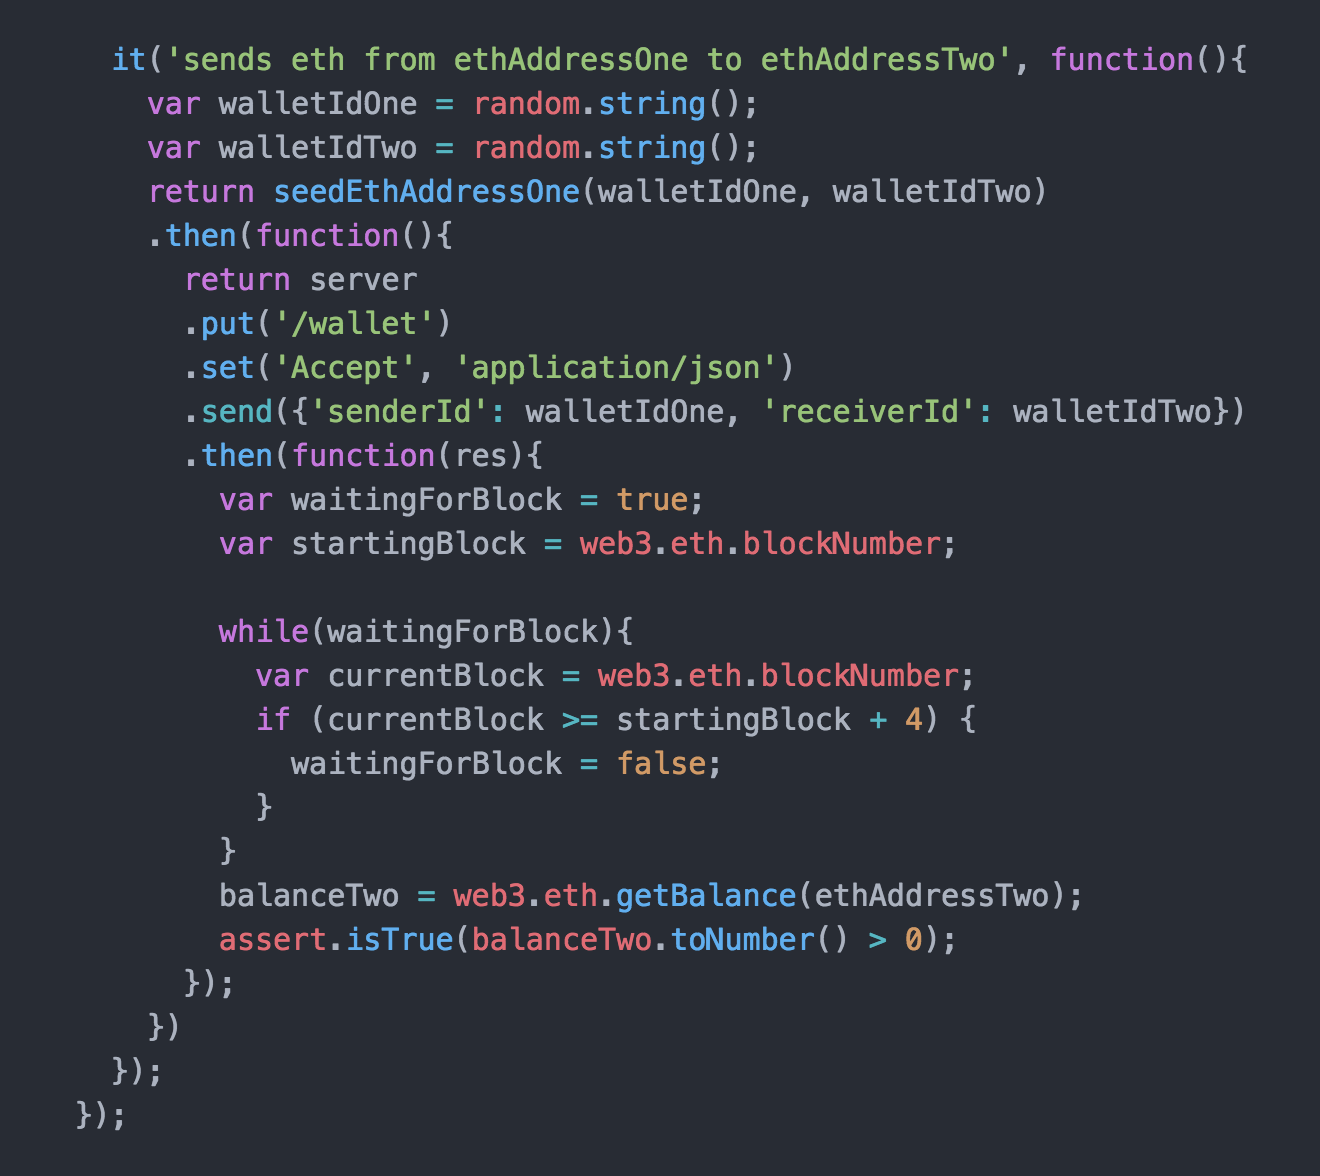
The test in question
Looking Forward
When this project began the major question was, “Can you build an application on blockchain that would be applicable in a business setting?” This project was primarily technically driven. As a result, we started with the solution and then found a problem to address. Because of this, it has been difficult to quantify how much business value this application has added; however, we have been able to answer the primary question and this project has paved the way for even more exciting uses of blockchain at our client and within Thoughtworks.
Going back to Angela, imagine that an external party needs to know that someone at our client’s company has read the quarterly earnings. The application can hash Angela’s name and the quarterly earnings report and use those hashes as our “walletIds” on the Node request.
The hashes would then be passed along to the external party for confirmation. The third party would know which public addresses correspond to which hashes and receive a copy of the document. Since we are using the same hashing algorithm, they would also be able to verify that the document has been read.
This would be particularly useful if a regulator wants to ensure a given company has been compliant. A company can easily comply, without exposing any of their employee’s personal information.
Take it one step further: for instance, a client buys a compliance insurance policy. The insurance company and regulators could then run nodes and mandate the client to use tamper proof read receipts.
In financial services, the stakes are high because public and private funds are at risk. Companies and the government need to find ways to mitigate these risks. Applications like this are critical to increasing accountability and decentralizing risk and across the industry.
Disclaimer: The statements and opinions expressed in this article are those of the author(s) and do not necessarily reflect the positions of Thoughtworks.