Enable javascript in your browser for better experience. Need to know to enable it? Go here.
Blogs Banner

CD4ML with Jenkins in DAGsHub — Part 2

This is the second part of two part series blog, discussing how you can achieve continuous delivery for machine learning (CD4ML) using Jenkins and DVC pipelines. In part One, we explained what is CD4ML, why you should care, and how Jenkins pipelines can be used to implement it.

In this blog we will discuss the Jenkins Pipeline in detail, basically how the whole Jenkinsfile has been defined.

Let’s dive into our Jenkinsfile.

Jenkins agents are an execution environment, where our pipeline and stages are executed by Jenkins. It is a good practice to run our jobs inside Docker containers, and we can achieve this by defining our agents to be containers. This enables us to have an easy, maintainable, reproducible, and isolated job environment setup. That way, debugging environment-specific issues becomes easier as we can reproduce the jobs execution env conditions anywhere.

The Using Docker with the Pipeline section of Jenkins documentation, guides us on how we can define agents to be a docker container. We will follow one of the patterns, where we define it through a Dockerfile checked into the root directory of our project. Let’s go through how we have defined our Jenkins Agent.

Jenkins Agent:

Here we define the agent to be a container, built from this Dockerfile.
Agent Definition:
 
agent {
    dockerfile {
        additionalBuildArgs  '--tag rppp:$BRANCH_NAME'
        args '-v $WORKSPACE:/project -w /project -v /extras:/extras -e PYTHONPATH=/project'
    }
}
Details:
  • additionalBuildArgs  '--tag rppp:$BRANCH_NAME' Will tag the job docker image with the name {repo-name}:{branch-name}.
  • -v $WORKSPACE:/project — Our repository has been mounted inside the container to /project.
  • -w /project – This makes sure that all our pipeline stage commands are executed inside our repo directory.
  • -v /extras:/extras – We have also mounted /extras volume to cache any files, between multiple job runs. This will help in reducing build latency and avoid unnecessary network load. For more info check Sync DVC remotes pipeline stage.
  • -e PYTHONPATH=/project – Adds /project as an additional directory where python will look for modules and packages.
Now that we’ve seen how our agent is defined as a Docker container in Jenkins, let’s see what that container includes:
# Dockerfile
FROM python:3.8                       # Base image for our job
RUN pip install --upgrade pip && 
    pip install -U setuptools==49.6.0 # Upgrade pip and setuptools
RUN apt-get update && 
    apt-get install unzip groff -y    # Install few system dependencies
COPY requirements.txt ./              # Copy requirements.txt file into image
RUN pip install -r requirements.txt   # Installing project dependencies
When building docker images from a Dockerfile, we can control which files docker needs to consider to create docker context, by defining ignore patterns in a .dockerignore file. This enables faster and lighter Dockerfile builds. In our case, the only external file needed to build the Docker image is the requirements.txt file:
 
# .dockerignore
*                    # Ignores everything

!requirements.txt    # except for requirements.txt file ;)

Now that we’ve defined the docker image we want to use to run our pipeline, Let’s dive into our Jenkins pipeline stages.

Stages

Here are a few stages that we will be defining in our Jenkins Pipeline:
Figure 1: End-to-end Jenkins pipeline stages
  • Run unit tests
  • Run linting tests
  • DVC specific stages
    • Setup DVC remote connection
    • Sync DVC remotes
    • On Pull Request
      • Execute end-to-end DVC experiment/pipeline
      • Compare the results
      • Commit back the results to the experiment/feature branch

Run unit tests

We have defined all our test cases in the test folder and are using pytest to run them for us.
stage('Run Unit Test') {
    steps {
        sh 'pytest -vvrxXs'
    }
}

Run Linting Test:

For linting check, as standard practice we will use flake8 and black.
 
stage('Run Linting') {
  steps {
    sh '''
      flake8 . --count --select=E9,F63,F7,F82 --show-source --statistics
      flake8 . --count --max-complexity=10 --max-line-length=127 --statistics
      black . --check --diff
    '''
  }
}

DVC Stages:

This is the core of the blog, where we define how to run our machine learning experiments in the CI/CD pipeline. i.e running the DVC pipeline within the Jenkins pipeline.
 

Setup DVC remote connection:

Similar to how we use git to version our code files, we use DVC to version our data, models, and artifacts. Just like Git remotes, DVC also has a concept of a remote. A DVC remote is just a shared storage space, where we can push/pull the artifacts. You can check DVC supported storage types here.

We are using DAGshub Storage as our DVC remote, to share data and models between collaborators. As Jenkins is also one of the collaborators, we need to set up credentials for Jenkins to be able to push/pull from this remote.

You can save the credentials to access DAGshub Storage as credentials (Username and Password) in Jenkins Management UI. Now to use it as part of the stage.

 
stage('Setup DVC Creds') {
    steps {
        withCredentials(
            [
                usernamePassword(
                    credentialsId: 'DVC_Remote_Creds',
                    passwordVariable: 'PASSWORD',
                    usernameVariable: 'USER_NAME'),
            ]
        ) {
            sh '''
                dvc remote modify origin --local auth basic
                dvc remote modify origin --local user $USER_NAME
                dvc remote modify origin --local password $PASSWORD
                dvc status -r origin
            '''
        }
    }
}
Explanation:
  • withCredentials(...) — Binds the username and password to mentioned environment variables, to be used inside job steps. See the documentation here
  • credentialsId: 'DVC_Remote_Creds' — I have set up credentials in Jenkins UI under credentialsID DVC_Remote_Creds
  • Finally with dvc status -r origin, we will test our connection with the remote. DVC remote information is defined in the config, .dvc/config file

Sync DVC remotes

Use of Jenkins local cache to reduce network load and build latency.
Figure 2: Use of Jenkins local cache to reduce network load and build latency

Now that we have set up the Jenkins connection with DVC remote, we need to fetch data and model files that are already versioned by DVC. This is necessary as DVC expects us to have the latest version of artifacts, referenced by the dvc.lock file. This can be done with the dvc pull command.

Fetching our DVC versioned files from remote storage increases our network load, build latency, as well as the service usage costs. To optimize this we can cache files we’ve already fetched during previous builds. This way, we only need to fetch new files that haven’t been fetched before.

We will use the mounted volume /extras for this caching and refer to it by dvc remote jenkins_local. More info can be found in the Jenkins Agent definition and .dvc/config file.

While origin is our primary storage, we use jenkins_local as a secondary local storage!
 
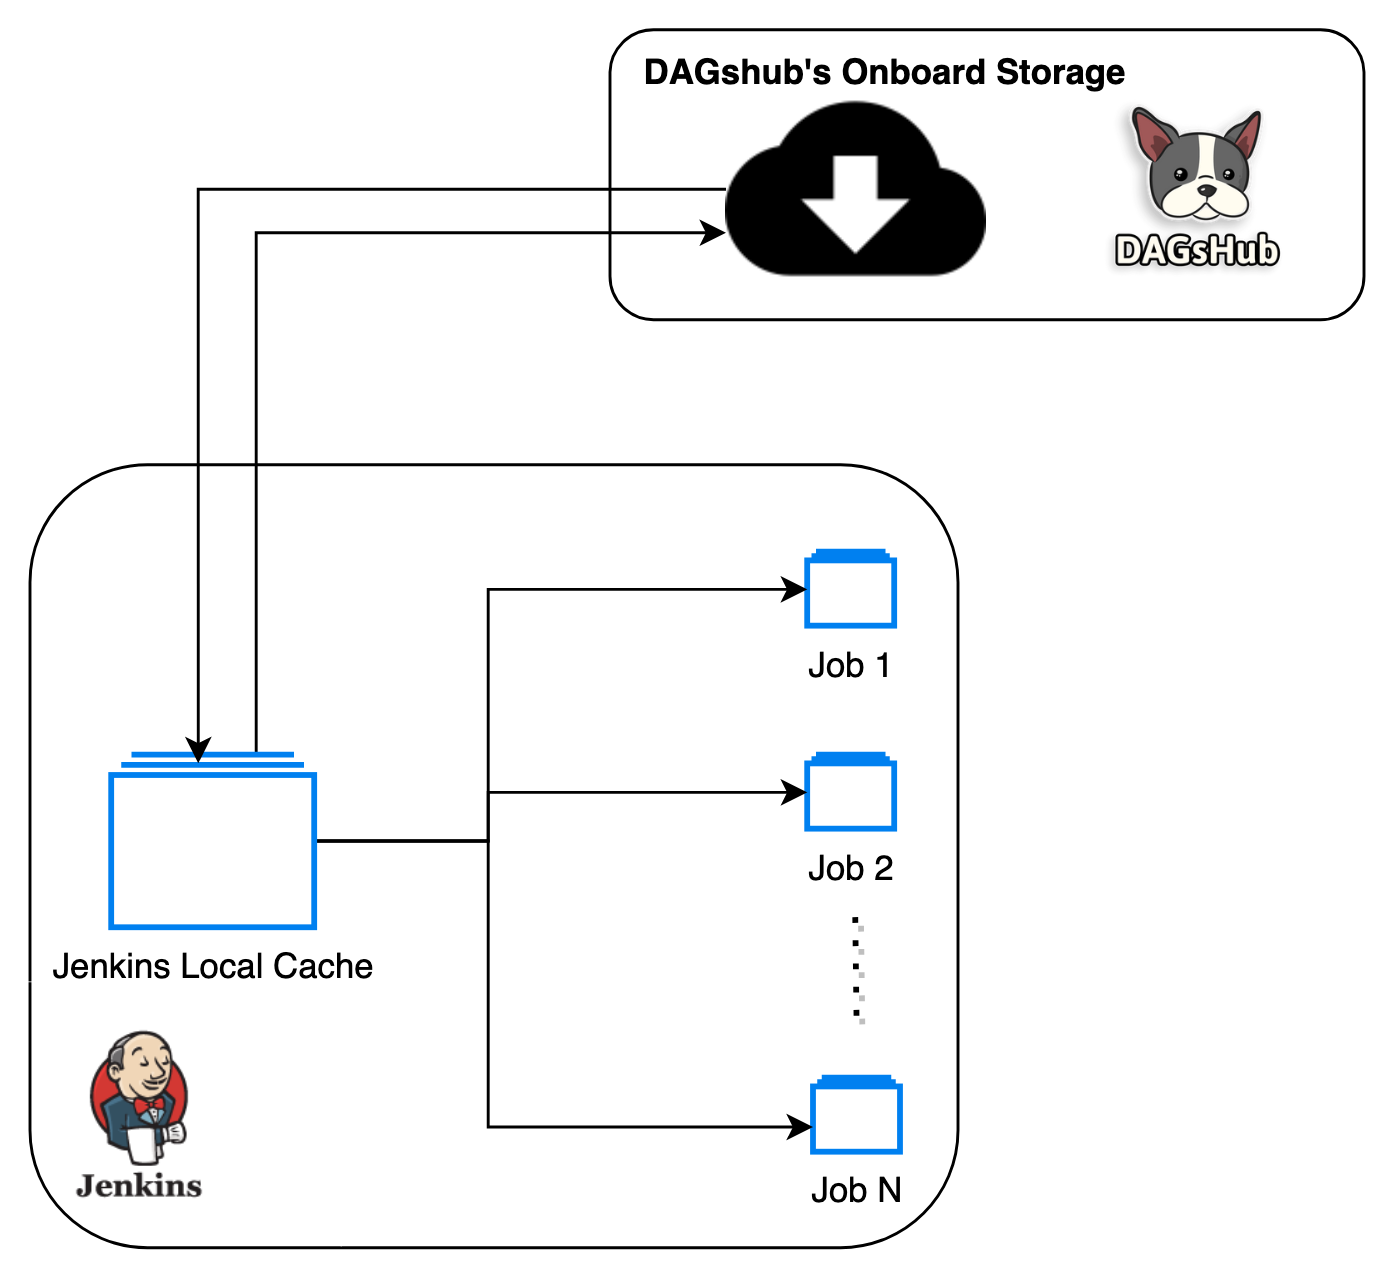
stage('Sync DVC Remotes') {
  steps {
    sh '''
      dvc status
      dvc status -r jenkins_local
      dvc status -r origin
      dvc pull -r jenkins_local || echo 'Some files are missing in local cache!'                          # 1
      dvc pull -r origin         # 2
      dvc push -r jenkins_local  # 3
    '''
  }
}

Explanation:
  • First, we fetch cached files from jenkins_local.
  • Then, we only fetch the required diffs, by pulling from the origin. And if nothing is missing, it will skip pulling anything, which saves network and disk space
  • We then sync both the remotes, by pushing the diffs back to jenkins_local

Now that we have the latest versions of the artifacts, we can run our experiments, by running the DVC pipeline.

Update DVC Pipeline:

Once you have defined the DVC pipeline, running your experiment is straightforward with the dvc repro command. Every run of your DVC pipeline can potentially create new versions of data, models, and metrics.
Hence the question is: when should you run your experiments?

Should we run for:
  • All commits?
  • Only for changes in the master branch?
  • Should we set up some manual trigger?
  • Based on some “special” commit message syntax?
  • or On Pull request?
Let’s analyze the pros and cons of each of these options:
Options Pros Cons
For All Commits We will never miss any experiment This will increase build latency. It will be extremely expensive if we use cloud resources for training jobs. Might be overkill to run the DVC pipeline for all commits/changes
Only for changes in the master branch Only master branch experiments are saved, which ensures only "approved" changes and experiments are tracked. We can not compare experiments in the feature branch before merging it to master.“Bad” experiments can slip through the PR review process and get merged to master before we could catch it.
Setup a manual trigger We can decide when we want to run/skip an experiment. Automation is not complete. There is still room for manual errors.
“Special” Commit message syntax We can decide when we want to run/skip an experiment. Automation is not complete. There is still room for manual errors. Commits are immutable, and it would be awkward to amend or create a new commit just to add the instruction. It also mixes MLOps instructions with the real purpose of the commit messages - documenting the history of the code
On Pull Request We can run and compare experiments before we approve the PR. No “Bad” experiments can now slip through the PR review process. None
After all these considerations, here is the definition of the DVC repro stage in our Jenkins pipeline:
stage('Update DVC Pipeline') {
  when { changeRequest() }                                       //# 1
  steps {
    sh '''
      dvc repro --dry -mP
      dvc repro -mP                                                # 2
      git branch -a
      cat dvc.lock
      dvc push -r jenkins_local                                    # 3
      dvc push -r origin                                           # 3
    '''
    sh 'dvc metrics diff --show-md --precision 2 $CHANGE_TARGET' //# 4
  }
}

Explanation:
Note that $CHANGE_TARGET refers to the Pull request target branch (usually the master or main branch).
  • when { changeRequest() } – Make sure to run this stage only when Pull Request is open/modified/updated
  • dvc repro -mP – runs the pipeline end-to-end and also prints the final metrics
  • dvc push – saves the results (data & models) to remote storage
  • dvc metrics diff – compares the metrics in PR source vs PR target branches
Comparing metrics between feature branch and master
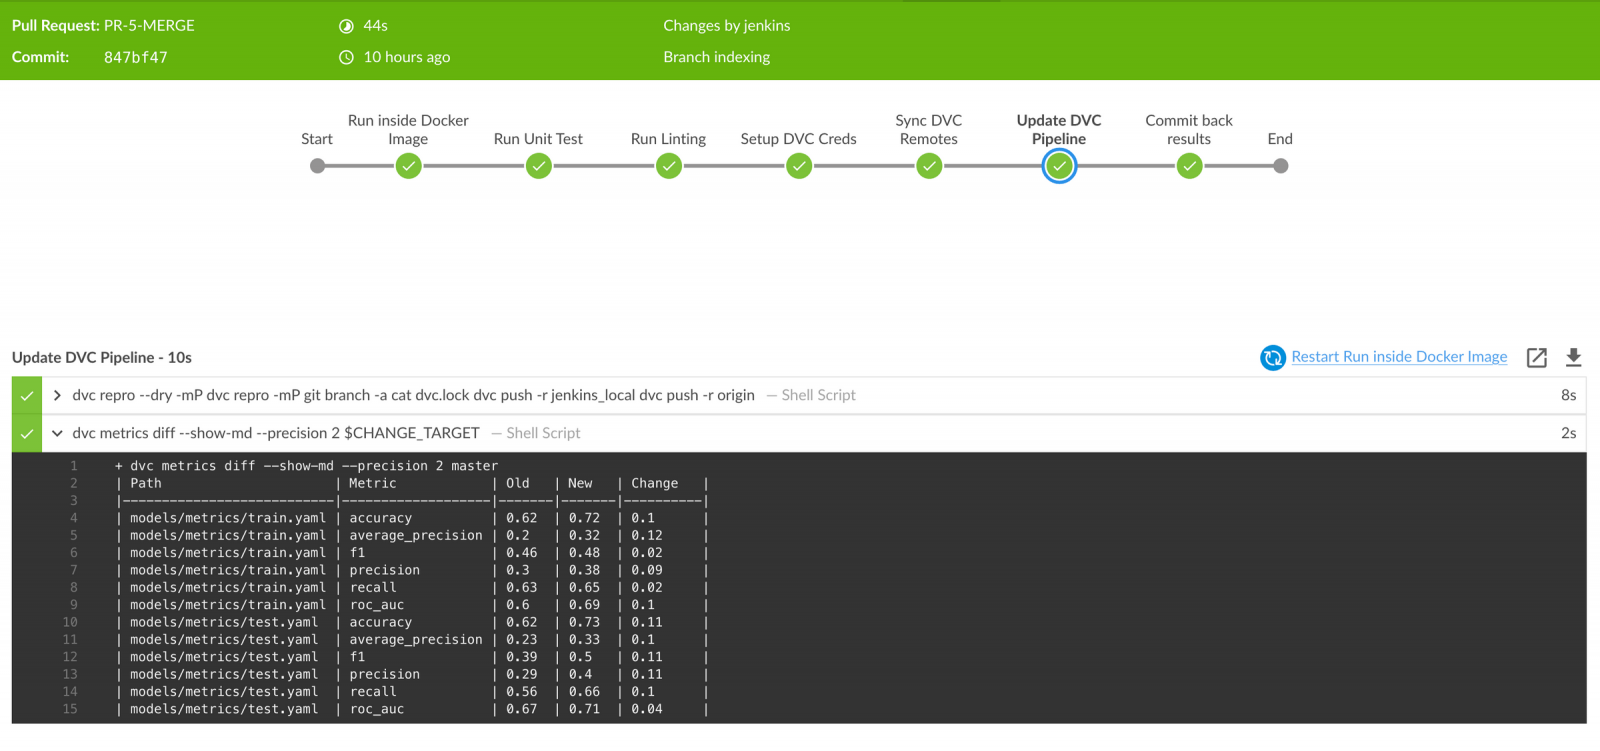
Figure 3: Comparing metrics between feature branch and master


Commit back Results:

Once our DVC pipeline has finished running, it will version the experiment results and modify corresponding metadata in the dvc.lock file.

When we commit this dvc.lock file into Git, we can say the experiment is saved successfully.

This is important, because for a given Git commit, by looking at its dvc.lock file, DVC will understand which versions of each file needs to be loaded from our cache. We can check out that particular version by using the dvc checkout command.

All we have to do is check if the dvc.lock file got modified. If it has, we should push those changes back. There are many ways to do this:
  • Logging the file in the build logs
  • Exporting the file as a build artifact
  • Committing the file to Git.
I feel that committing the files back to Git is the best option, mainly because it will not require any manual steps from collaborators and thus is less error-prone. The way we achieve this is by checking for changes in our dvc.lock file and committing them back on the same Git feature/experiment branch.
 
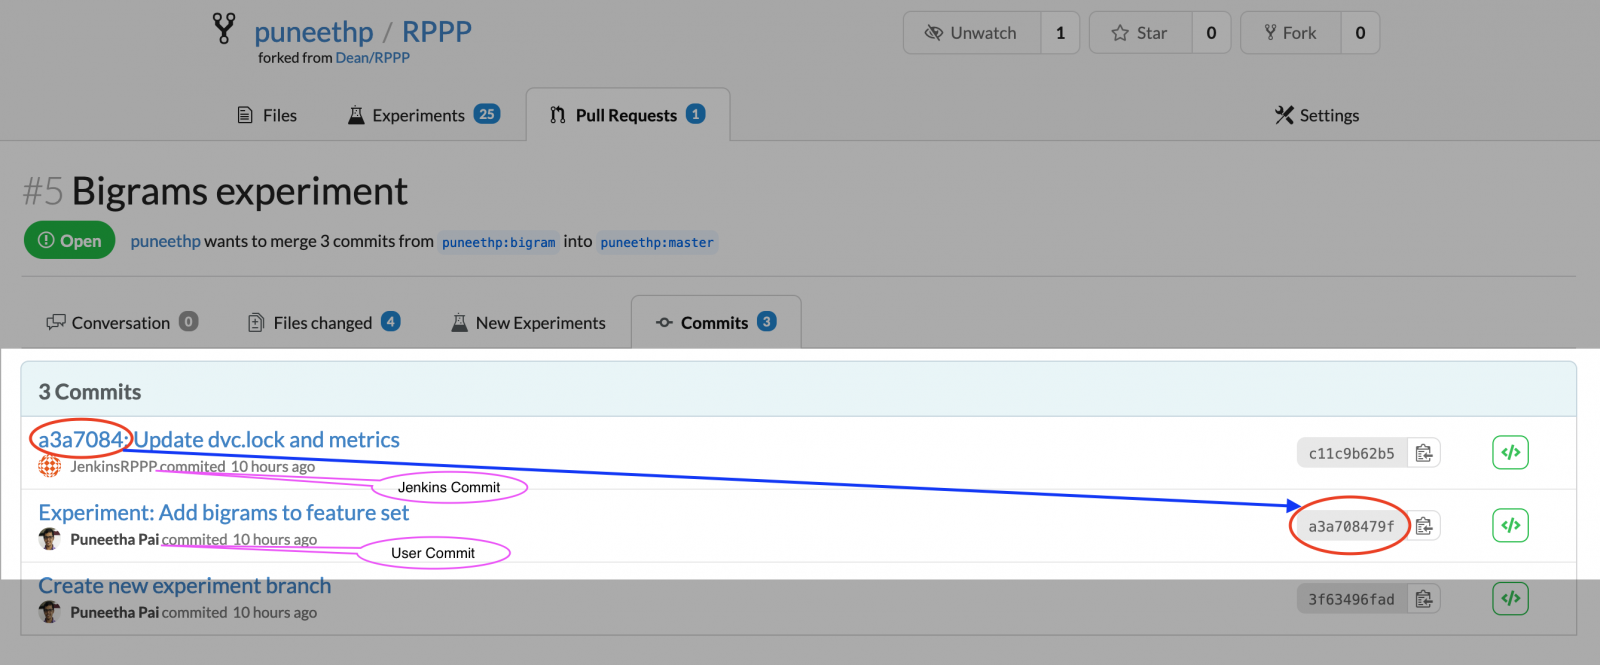
stage('Commit back results') {
  when { changeRequest() }
  steps {
    withCredentials(
      [
        usernamePassword(
          credentialsId: 'GIT_PAT',
          passwordVariable: 'GIT_PAT',
          usernameVariable: 'GIT_USER_NAME'),
      ]
    ) {
        sh '''
          git branch -a
          git status
          if ! git diff --exit-code dvc.lock; then              # 1
            git add .
            git status
            git config --local user.email $JENKINS_EMAIL         # 2
            git config --local user.name $JENKINS_USER_NAME      # 2
            git commit -m "$GIT_COMMIT_REV: Update dvc.lock and metrics"
                                                                # 3
            git push https://$GIT_USER_NAME:$GIT_PAT@dagshub.com/puneethp/RPPP HEAD:$CHANGE_BRANCH                           # 4
          else
            echo 'Nothing to Commit!'                           # 5
          fi
      '''
    }
  }
}


Explanation:
  • git diff --exit-code dvc.lock – Check whether there are changes in DVC tracked files, i.e check if it’s a new experiment
  • git config --local user.<email&name> – Configure Git with the Jenkins username and email before committing
  • git commit -m “$GIT_COMMIT_REV: …” – Commit with a reference to the parent commit $GIT_COMMIT_REV. This helps us also understand for which user commit the experiment was run by our Jenkins Pipeline
  • git push <url> HEAD:$CHANGE_BRANCH – Push to our experiment/feature branch saved in environment variable $CHANGE_BRANCH
  • The else clause is used to print that there was nothing to commit. This means the DVC pipeline is already up to date
And now, we can see the results pushed to our Data Science Pull Request, along with the resulting models, experiments, and data:


Figure 4: Jenkins commit to save experiment results and updating Pull Request


Conclusion

We demonstrated how Jenkins can be used to automate execution of machine learning and data science pipelines, using docker agents, version controlled pipelines, and easy data and model versioning to boot.
Of course, all of these steps and workflow are completely customizable. We just present one way which made sense to us. With open source protocols like Git, DVC, Docker, and Jenkins, any workflow can be adjusted to suit your needs.

This article first appeared on DAGsHub.com

Disclaimer: The statements and opinions expressed in this article are those of the author(s) and do not necessarily reflect the positions of Thoughtworks.

Keep up to date with our latest insights