


The pace with which the development of mobile applications grows is impressive. An interesting challenge is to maintain agile practices in such an environment where resources are always limited. We must rely on the help of simulators, Mac servers, a lot of Apple configurations, and so on. Thoughtworks is a pioneer in using agile methodologies such as process automation and continuous delivery for web projects, and this should not be different for mobile. On our mobile projects, we continuously deploy to the client device. This puts him closer to the development process, leads to early feedback, and allows us to test the application in a real environment. Thus the client can easily decide when to launch his wonderful app to the world. Cool huh? So let's do it!
Assumptions for this post:
- You have an Apple iOS Developer Enterprise Account - required to have an Ad Hoc Apple certificate, enabling deployment in Testflight.
- You have Jenkins, Go or any other CI of your preference installed.
Step #1 Configuration on Apple's website
1. Login to your Apple account and click on "Certificates, Identifiers & Profiles".
2. Create a Distribution Certificate
Under "Certificates", add a new Distribution Certificate.
Download the .p12 file and install it.
3. Create an App ID
Under Identifiers, add a new App ID.
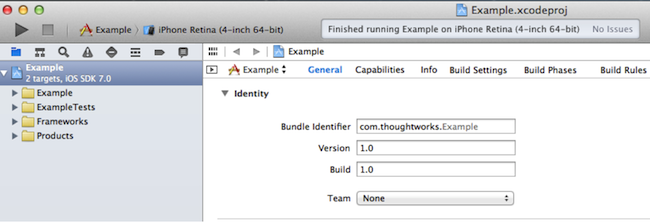
Enter the required fields. The BundleID can be found in XCode in its target General tab.

For example, we can create a Wildcard AppID, with the Bundle ID as "com.thoughtworks. *".
4. Add devices to your Apple account
Under "Devices", add a new one. Enter the name and UDID.
If you have trouble finding the UDID of your phone, see the link http://whatsmyudid.com/
5. Create an Ad Hoc Provisioning Profile.
Under "Provisioning Profiles", add a new one.
Select "Ad Hoc". In the steps that follow, choose your AppID, distribution certificate, the devices to which you want to be able to install your app, generate the profile and download it. Double-click on it and Add to your Library.
Step #2 Configuration on the TestFlight website
1. Create an account on Testflight and then create a team by clicking the "Create a new team" button.
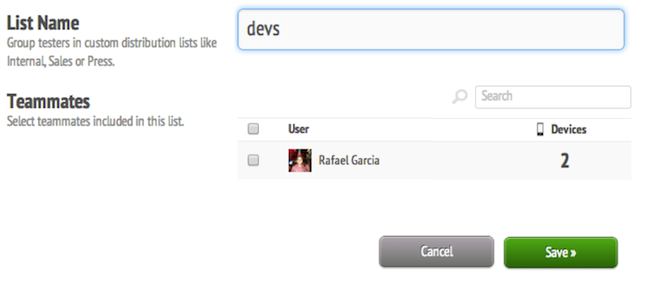
2. Click the “People” link and create a new distribution list using the "Add distribution list" button. Give a name to the list and select the users to whom you want to provide a version of the app for every build in Jenkins.

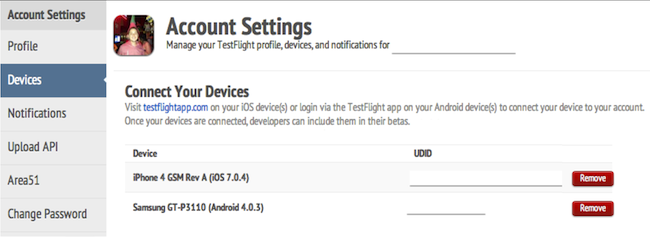
3. Click on your avatar and visit the Account Settings link. Then click on the Devices link and follow the instructions. After logging into your phone via your account, it should appear on the page:

Step #3 Configuring your project
If you want to test an actual device, you must set your Apple Developer Certificate to your project:
1. Check the settings of your target in your project in XCode.
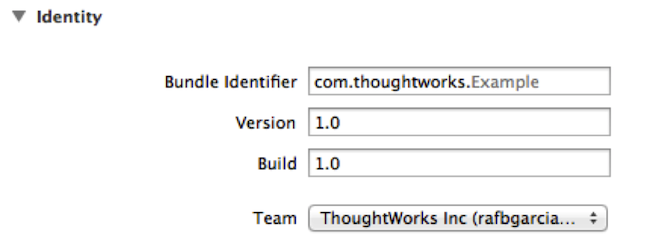
2. On the General tab, select your team:

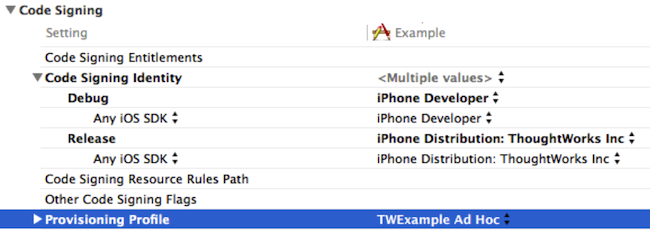
3. Add your Ad Hoc Provisioning Profile and Distribution Certificate. In the Build Settings tab, under Code Signing, enter the Code Signing Identity > Release and the Provisioning Profile:

Step #4 Configuring your CI
We will be using Jenkins in this post.
1. Create a new "Build a free-style software project" project.
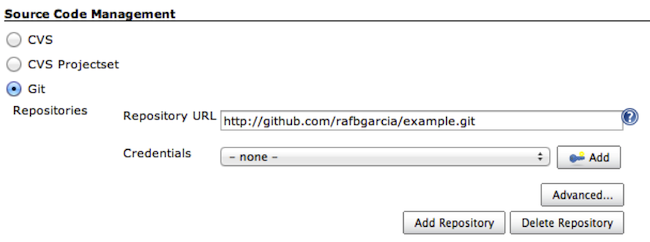
2. Configure the clone of your repository:

3. Install xctool - a replacement for Apple's xcodebuild that makes it easier to build and test your iOS projects:
$ brew install xctool
4. Add the following commands in the build phase:
Give access permission to your keychain: This is optional. You can also click "Allow" when the build process prompts.
security unlock-keychain -p <MAC_USER_PASSWORD> $HOME/Library/Keychains/login.keychain
Test
xctool -project Example.xcodeproj -scheme Example test -test-sdk iphonesimulator
Build
xctool -project Example.xcodeproj -sdk iphoneos -scheme Example build CONFIGURATION_BUILD_DIR=~/Desktop
Sign the app
xcrun -sdk iphoneos PackageApplication -v ~/Desktop/Example.app -o ~/Desktop/Example.ipa --sign "iPhone Distribution: <CERTIFICATE_NAME>" --embed ~/Desktop/Example_Ad_Hoc.mobileprovision
Upload to TestFlight using it's API
curl http://testflightapp.com/api/builds.json
-F file=@"$HOME/Desktop/Example.ipa" # path to your .ipa file
-F api_token='<YOUR_UPLOAD_API_TOKEN>' # you can find it at https://www.testflightapp.com/account/#api
-F team_token='<YOUR_TEAM_TOKEN>' # you can find it at https://www.testflightapp.com/dashboard/team/edit/
-F notes="`git log -1 --pretty=%B`" # gets the last commit message
-F distribution_lists='devs' # the name of your distribution list in Testflight
5. Run "Build now" and it should work as expected.
Tip
If you face problems installing the app on your phone, try using the iPhone Configuration Utility to view your phone logs.
That's it for now. I'm curious, what is your opinion about the process? Do you have a different approach to achieving the same goal?
Share your thoughts with us below…
.
Disclaimer: The statements and opinions expressed in this article are those of the author(s) and do not necessarily reflect the positions of Thoughtworks.